
P&P Workflow: #1

Before:
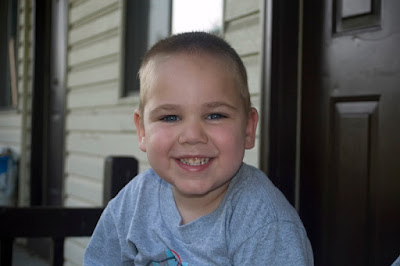
Taken in Malta, NY 7/3/06, 4:09 PM in full shade.
- Nikon D50
Auto Exposure Mode
18.0-50.00 f/3.5-5.6 lens
1/125 at f/5.6
ISO 400
On-Camera Flash did fire
Focal Length 50mm
JPEG – I was letting my nephew use the camera and didn’t feel the need to shoot in RAW.
In Lightroom – Develop Module:
- Cropped so the subject would be centered on the right-hand third line and the eye brows would be just about even with the top third line.
- Basic:
Convert to Grayscale
Blacks: 15
Brightness: +18
Contrast: +45 - Tone Curve:
Moving the sliders below the curve to 43, 65, and 81 to direct where the adjustments will be focused.
Highlights: +8
Lights: +11
Darks: 0
Shadows: -35 - Grayscale Mixer:
I made the blues and cyans that appear in his shirt darker in order to draw the eye into the lighter tone in his face. Likewise, the greens help to darken the background ever so slightly.
Reds: +150
Yellows: +106
Greens: -50
Cyans: -50
Blues: -6
Magentas: -50 - Split Toning:
Highlights & Shadows: Hue 22, Sat 25 - Detail:
Sharpen and Smooth = 100
De-noise: 0
In Photoshop CS3 beta:
- Convert the image for SmartFilters
- In Quick Mask, using a black to white radial gradient, I made a selection from the center of the face to the left edge.
- Exit Quick Mask and add a Lens Blur with the following settings:
Shape: Hexagon
Radius: 26
Blade Curvature: 4
Rotation: 49
Brightness: 0
Threshold: 255
Noise: 2 (Uniform, Monochromatic) - In the mask, paint with black over the subject, especially the edges to make him stand out from the background even more.
- I applied a Vignette with the Lens Correction Filter with an Amount of -40 and a Midpoint of +30 to hold the viewer in the frame.
- Applied a Curves Adjustment Layer with a Blend Mode of Luminosity, to the eyes with an Input of 25 and Output of 50. When I made the initial adjustments in Lightroom the tone of the eyes were pushed towards black, this just brings them back a little.
After: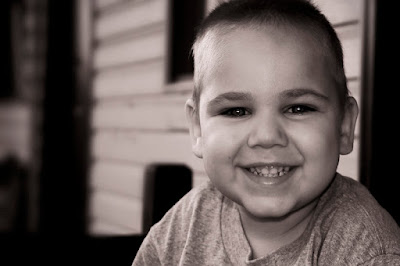
*If you would like to contribute to the P&P Workflow, please email Jason.


